Windows Phone ListView and Grouping
This is the first article a series exploring some of the technical challenges I encountered while writing my Agenda View Windows Phone app. My first topic is multi-level grouping. Surprisingly, doing this well turns out to be sufficiently hard that I’ll be writing four articles on it!
Note that although I'm discussing a phone app, most of the content in these articles is applicable to Windows 8 store apps and Universal apps.
In this first article, I’ll show the ListView control’s built-in grouping features, and explain why they’re not quite sufficient for this app. I’ll also show an alternative approach that enabled multi-level grouping with very little work, but which turned out to have problems when applied to real data. In later articles I’ll explain what I ended up doing instead.
The App’s Grouping Requirements
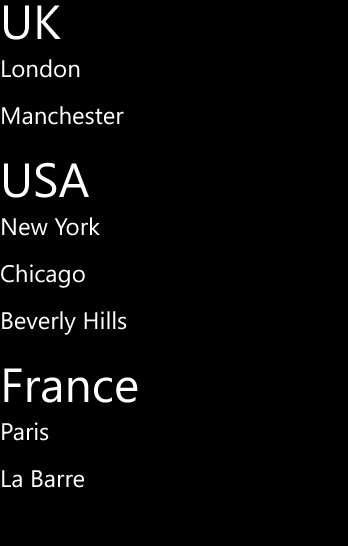
The app displays appointments grouped by both time and day. If you happen to have conflicting appointments that start at the same time, these will come under a single heading showing that time. And at a wide scale, all of the day’s appointments are grouped under a heading showing either the text TODAY, or the relevant date if the appointment is further out. I’ve annotated a screenshot to show precisely how grouping occurs:

I’ve outlined individual items in red. These are grouped by start time, as shown with the green outlines. And those time groups are in turn grouped by day, shown here with a blue outline. I’ve also shown the same hierarchy in a sort of treeview-like structure to the side.
Most items have a distinct start time—people usually try to avoid scheduling multiple simultaneous appointments, so you’d normally expect each time group to contain exactly one item. But sometimes collisions occur, and in this case, you can see I’ve got two items in the time group for 6:30pm near the top. That’s why I need an additional level of grouping within the day groups.
This logical structure was non-negotiable, because this is how the Calendar app used to show things (up until the Windows Phone 8.1 update removed the agenda view) and the entire point of my app was to provide something as close as possible to the original feature. However, this turns out not to be totally straightforward, because the ListView control available in store apps does not support multi-level grouping. (I can only assume that the original Calendar app didn’t use XAML.)
ListView’s Built-In Grouping
All of Microsoft’s XAML frameworks support grouping, but the way this works has changed with the introduction of WinRT (or ‘store apps’ to use Microsoft’s current name for apps that use this API), first for Windows 8, and now for Windows Phone 8.1. With all the other versions of XAML, you would enable grouping with something like this:
<CollectionViewSource x:Key="src">
    <CollectionViewSource.GroupDescriptions>
        <PropertyGroupDescription PropertyName="Country" />
        <PropertyGroupDescription PropertyName="Town" />
    </CollectionViewSource.GroupDescriptions>
</CollectionViewSource>
In pre-WinRT XAML, your data source supplied a flat list of items, and you asked the CollectionViewSource to gather it into groups for you, according to one or more grouping criteria. The example above states that items should be grouped by the value of their Country property, and then within each country group, items should be grouped by the value of a Town property. (By the way, the Windows Phone version of Silverlight doesn’t support this properly. It accepts the XAML above, but it appears to ignore everything after the first level.)
But if you use WinRT (because either you’re writing a Universal app that targets both tablets and phones, or you’re writing a Windows 8 store app, or you’re writing a phone-only app and have chosen to use the ‘store app’ template instead of the Silverlight one) things are different. Data binding will not group the data for you. You must supply it with a collection of collections, e.g.:
public class CountryGroup : ObservableCollection<SourceData>
{
    public CountryGroup(IEnumerable<SourceData> items) : base(items)
    {
    }

    public string Country { get; set; }
}
If you have a flat list, you can build the groups easily enough:
IEnumerable<CountryGroup> groups =
    from item in SourceData.GetData()
    group item by item.Country into countryGroup
    select new CountryGroup(countryGroup)
    {
        Country = countryGroup.Key
    };
Next, you need a CollectionViewSource with grouping enabled:
<CollectionViewSource
    x:Key="src"
    IsSourceGrouped="True" />
You can then supply that with your group list, either in code behind:
var cvs = (CollectionViewSource) Resources["src"];
cvs.Source = groups.ToList();
or you could hook it up with data binding. Either way, the goal is to supply a collection of collections to the Source property of a CollectionViewSource in which IsSourceGrouped is true.
With this in place, you can now use it in a ListView, and you provide a group style to determine how the group headings should appear:
<ListView
    ItemsSource="{Binding Source={StaticResource src}}">
    <ListView.GroupStyle>
        <GroupStyle>
            <GroupStyle.HeaderTemplate>
                <DataTemplate>
                    <TextBlock
                        Text="{Binding Country}"
                        FontSize="40" />
                </DataTemplate>
            </GroupStyle.HeaderTemplate>
        </GroupStyle>
    </ListView.GroupStyle>

    <ListView.ItemTemplate>
        <DataTemplate>
            <Grid Height="80">
                <Grid.RowDefinitions>
                    <RowDefinition />
                    <RowDefinition />
                </Grid.RowDefinitions>
                <TextBlock
                    FontWeight="Bold"
                    FontSize="24"
                    Text="{Binding Town}" />
                <TextBlock
                    Grid.Row="1"
                    FontSize="20"
                    Text="{Binding Address}" />
            </Grid>
        </DataTemplate>
    </ListView.ItemTemplate>
</ListView>
Running the app shows the data grouped by country, using the group header template to display the country name at the top of the group:

That group header is ‘sticky’ in that it stays put at the top of the list as you scroll through the group:

As you scroll into the next group, its header slides into place, pushing the header of the previous group out of the way. Here’s that transition in action, half way through:
![]()
That’s all very well, but there’s an obvious problem with my example: within each group, I have several items all with the same town or city name. I’d like to group those too.
We could try adding a second group class, and modifying the top-level one:
public class TownGroup : ObservableCollection<SourceData>
{
    public TownGroup(IEnumerable<SourceData> items)
        : base(items)
    {
    }

    public string Town { get; set; }
}

public class CountryGroup : ObservableCollection<TownGroup>
{
    public CountryGroup(IEnumerable<TownGroup> items)
        : base(items)
    {
    }

    public string Country { get; set; }
}
The code to group a flat list of items is now a little more complex, thanks to having two levels, but it’s still the same idea:
IEnumerable<CountryGroup> groups =
    from item in SourceData.GetData()
    group item by item.Country
        into countryGroup
        let countryGroupItems =
            from item2 in countryGroup
            group item2 by item2.Town
            into townGroup
            select new TownGroup(townGroup)
            {
                Town = townGroup.Key
            }
        select new CountryGroup(countryGroupItems)
        {
            Country = countryGroup.Key
        };
But how do we present these nested groups? A glance at the ListView control’s GroupStyle property provides hope:
public IObservableVector<GroupStyle> GroupStyle { get; }
As with longer-established XAML frameworks like WPF, the GroupStyle property is a collection. So you’d think we can provide a style for each grouping level, just like we would in WPF. Here’s a ListView with two group styles, and a correspondingly simpler item template:
<ListView
    ItemsSource="{Binding Source={StaticResource src}}">
    <ListView.GroupStyle>
        <GroupStyle>
            <GroupStyle.HeaderTemplate>
                <DataTemplate>
                    <TextBlock
                        Text="{Binding Country}"
                        FontSize="40" />
                </DataTemplate>
            </GroupStyle.HeaderTemplate>
        </GroupStyle>
        <GroupStyle>
            <GroupStyle.HeaderTemplate>
                <DataTemplate>
                    <TextBlock
                        Text="{Binding Town}"
                        FontSize="24" />
                </DataTemplate>
            </GroupStyle.HeaderTemplate>
        </GroupStyle>
    </ListView.GroupStyle>

    <ListView.ItemTemplate>
        <DataTemplate>
            <TextBlock
                FontSize="20"
                Text="{Binding Address}" />
        </DataTemplate>
    </ListView.ItemTemplate>
</ListView>
Sadly, this doesn’t work. Here’s the result:

That’s not quite what we wanted.
It turns out that the ListView is just ignoring the second group style. It’s only grouping to a single level, and it is treating those TownGroup objects as the list items. The TownGroup has no Address property, which is why the item template displays nothing. If I modify the item template to bind to Town (a property that is available on TownGroup) instead of Address, I see this:
The effect is that I’ve got a list of towns grouped by country—just a single level of grouping. The ListView is oblivious to the individual items within each country group.
The bottom line is that ListView does not support groups of groups of items.
Lists within Lists
Anyone with much XAML experience will probably think of an obvious solution at this point: if the item template is being given the nested group, why not just make that expand the children? We can go back to having a single group style (because ListView will ignore all but the first) and then in our item template (which, remember, is now being passed the nested TownGroup objects), we show the Town property as the group title, and then an ItemsControl to show all the items in the group:
<ListView
    ItemsSource="{Binding Source={StaticResource src}}">
    <ListView.GroupStyle>
        <GroupStyle>
            <GroupStyle.HeaderTemplate>
                <DataTemplate>
                    <TextBlock
                        Text="{Binding Country}"
                        FontSize="40" />
                </DataTemplate>
            </GroupStyle.HeaderTemplate>
        </GroupStyle>
    </ListView.GroupStyle>

    <ListView.ItemTemplate>
        <DataTemplate>
            <Grid>
                <Grid.RowDefinitions>
                    <RowDefinition />
                    <RowDefinition />
                </Grid.RowDefinitions>
                <TextBlock
                    FontWeight="Bold"
                    FontSize="24"
                    Text="{Binding Town}" />
                <ItemsControl
                    Grid.Row="1"
                    ItemsSource="{Binding}">
                    <ItemsControl.ItemTemplate>
                        <DataTemplate>
                            <TextBlock
                                FontSize="20"
                                Text="{Binding Address}" />
                        </DataTemplate>
                    </ItemsControl.ItemTemplate>
                </ItemsControl>
            </Grid>
        </DataTemplate>
    </ListView.ItemTemplate>
</ListView>
At first glance, this appears to work:
That certainly looks like what I wanted: everything is grouped by country, and within each country the items are grouped by town, and I’ve been able to define a different style for the two group levels’ headings.
So what’s the problem?
Well the first obvious issue (for my app, at any rate) is that the individual items are no longer tappable—as far as this ListView is concerned, each item in the list is the whole town group. I tried replacing the ItemsControl in the item template with a nested ListView as a quick fix, but that just seemed to slow things down drastically. When I do that, the app has trouble keeping up with even fairly pedestrian scrolling on the phone I use for development. (A Nokia Lumia 620.) However, while this hack didn’t work, I expect it’s possible to make individual items tappable with suitable changes to the item template.
But there’s another problem: it turns out that whether you nest a ListView or an ItemsControl this solution doesn’t work well once you start using anything more than about one and a half screen’s worth of data. (This means that if, like me, you build a prototype to test whether your approach is viable, it all looks like it’s working beautifully until you plug in some real data, and only then do you discover that you’ve gone down a blind alley. I hope that this series of articles will save you from that fate.)
The problems really only become apparent when you start scrolling back up through the list having scrolled down through it. The content starts jumping around on the screen, and sometimes the entire list goes blank for a few seconds before reappearing.
If you want to see the issues yourself, you can grab the app from here. Run it on a real phone, and scroll a long way down through the data, and then back up again reasonably quickly. You’ll see pretty quickly that this is not a usable solution.
As far as I can tell, the fundamental problem is that virtualization does not mix well with variable item heights. (Switching virtualization off is not a realistic option for my app, by the way.) There’s a subtle but critical difference between the item template in the last XAML snippet, and the one in the first ListView snippet in this blog entry. Here’s the important bit from the first one:
<ListView.ItemTemplate>
    <DataTemplate>
        <Grid Height="80">
And here’s the corresponding piece of the one that didn’t work well:
 <ListView.ItemTemplate>
     <DataTemplate>
         <Grid>
The key is that the first example has a fixed height, but the second one doesn’t. It can’t, because that the second one contains an ItemsControl whose height will depend on the number of items in the group—the nature of that example is that each item (and remember, an ‘item’ in that example is actually group of addresses all in the same town) will need to determine its own height based on the number of items it contains.
In classic XAML terminology, the first item template has a constrained height, while the second sizes to content.
Variable item height has always been a problem for virtualized lists in XAML. (If you happen to have a Pluralsight subscription, take a look at the Templates module of my WPF and XAML Fundamentals course. If you watch the “ItemsControl Options” clip (12th clip in the module), starting at about 4:45 you get to see a WPF ListView going slightly haywire as a result of highly variable item sizes in a virtualized list.) And this in turn has meant that grouping has always been a tricky case, because groups almost always vary in height. So in a lot of scenarios, grouping in XAML just disables virtualization.
Variable item height seems to cause particularly visually distracting problems for the WinRT ListView. As far as I’ve been able to tell in discussions with people from Microsoft, the problems occur when it starts recycling containers that have scrolled off the screen—if those change size significantly when given new data, this appears to mess with the layout of the items that are still on the screen, causing the entire list to jump around in a rather disturbing way.
This turns out to be one of the main reasons for getting the ListView to help us with grouping in the first place. You can use that ItemsControl-in-item-template trick to handle any number of levels of grouping, including a single level, and if the trick actually worked properly, we wouldn’t really need ListView to provide built-in support for groups at all. (About the only thing it would really be doing for us is the neat ‘sticky’ group headers that slide into place as you scroll.) But because it’s pretty rare for each of the groups in a grouped list to have the same size, the trick does not in fact work. The virtualization mechanism goes a bit crazy trying to deal with the variation in sizes, and the result is that the app appears to be having a fit.
So in practice, the biggest benefit of using the built-in group support in the ListView is that it takes care of interleaving group headings for you in a way that the control’s underlying virtualizing panel can cope with, meaning that everything scrolls around nice and smoothly. As soon as you try to handle this yourself, it all seems to break down.
Conclusion
If you want just one level of grouping, the built-in support provided by ListView is excellent. But if you want groups of groups, it cannot help you. In the end, I needed to use a radically different approach to solve this problem, which I’ll describe in the next article in this series.