Gradient Fill Midpoints and WPF
WPF offers a couple of gradient fill types. LinearGradientBrush is for gradients that follow a straight line, and RadialGradientBrush is for gradients that run from a point to an elliptical boundary.
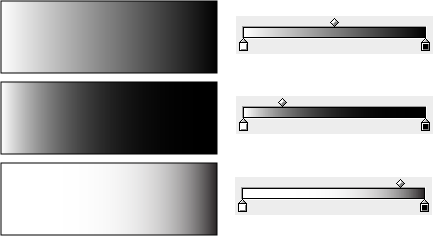
Both fill types support only linear interpolation of fill colours. This makes them more limited than the equivalent fills in Adobe Illustrator. Illustrator allows you to specify a ‘midpoint’ between each pair of points in a gradient fill. For example, here are three rectangles, each of which has a linear gradient fill running from white to black, but with different midpoints:

The right-hand side shows Illustrator’s gradient editor. The handles at the bottom edit the gradient stops, and the small square at the top sets the midpoint. If you add more gradient stops, you get a midpoint handle between each stop.
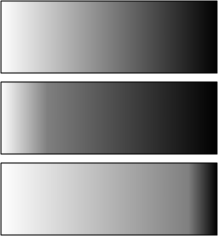
Mike Swanson’s XAML exporter plug-in for Illustrator attempts to simulate midpoints. Unfortunately, it oversimplifies things a little. Here’s how the three rectangles shown above look when converted to XAML, and rendered by WPF:

The top rectangle looks fine, because its midpoint is at dead centre. But the other two look wrong. There’s a clear discontinuity around the midpoints. Now you might think that it’s not a big deal—that the approximation is close enough. But let’s look at an example where the mismatch is more of a problem:

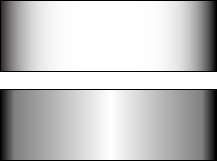
The top rectangle has been rendered by Illustrator, and beneath that is WPF’s rendering of the exported XAML version. This is a gradient fill with three stops—black at the left, white in the middle, and black at the right. The midpoint between the first and second stop is 13% of the way across the fill, while the midpoint between the second and third stop is 87% of the way across. It looks like this in Illustrator’s gradient editor:

Moving the midpoints out like this causes the fill to bunch up around the edges. This use useful for providing a rounded appearance—the rectangle suggests a squat cylinder viewed from the side.
The exported version has gone a bit wrong. Although it has bunched up the fills to the edges a little bit, it doesn’t look right. In particular, it’s less successful at suggesting a curved shape.
What has gone wrong? Is this WPF’s fault, or a deficiency in the converter? Actually, it’s a little of both.
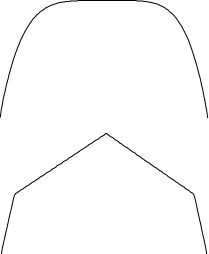
To understand the problem, let’s look at the images a little more closely. The nature of the difference is much easier to see if we plot the brightness of the fills as a graph:

The top line shows the brightness of the fill from left to right as rendered by Illustrator. The bottom line shows the brightness of the rendering of the exported XAML. The difference is obvious—the top line is curved, whereas the bottom line is a sequence of straight lines. (The curves Illustrator produces for gradients with midpoints always appears to be exponential, incidentally. Moreover, Illustrator appears always to pick a positive exponent, reversing the curve if necessary, presumably to ensure symmetry.)
This non-linear interpolation is the critical feature of gradient midpoints. To get the same effect by adding more linear gradient stops, you would need a large number—enough to approximate the shape of the curve. The XAML exporter attempts to simulate each midpoint by adding just one extra gradient stop, which is why it produces a poor approximation. The kinks you can see in the graph correspond directly to visible creases in the gradient fill.
Unfortunately, adding more gradient stops is the only option when exporting to XAML, because WPF doesn’t support midpoints. Gradient interpolation happens deep inside WPF’s rendering system. (The unmanaged MIL is responsible for the rendering process. The exact process is undocumented, but typically, the real work is done by the GPU on the graphics card.) So you can’t provide your own interpolation function for WPF’s built-in gradient brush.
Custom Gradient Brush
Things aren’t looking good. You can’t add your own new brush types to WPF because each of the built-in brush types depends on features down in the unmanaged rendering code, and the MIL doesn’t offer an unmanaged custom brush API. And unlike Mac OS X’s Quartz graphics system, you don’t get to provide a callback function to implement your gradient. (Indeed, such a thing would be hard to offer without compromising the ability to implement the gradient fill on the GPU.)
But that’s OK. We can fake it.
It turns out that it’s entirely possible to bring your own gradient. The technique is completely different from the one you use in Quartz 2D, but the net result is the same.
Look at this XAML:
<Grid xmlns:loc="clr-namespace:MidPointFills">
  <Rectangle Width="218" Height="72" Stroke="Black">
    <Rectangle.Fill>
      <loc:LinearGradientWithMidpointsBrush>
        <GradientStop Color="Black" Offset="0" />
        <loc:GradientMidpoint Offset="0.065" />
        <GradientStop Color="White" Offset="0.5" />
        <loc:GradientMidpoint Offset="0.935" />
        <GradientStop Color="Black" Offset="1" />
      </loc:LinearGradientWithMidpointsBrush>
    </Rectangle.Fill>
  </Rectangle>
</Grid>
I’ve set the Fill property of the Rectangle to a custom element, loc:LinearGradientWithMidpointsBrush. That seems odd, given that I just said you can’t define a custom brush type. But it’s not really a brush. In fact I’ve not even written a type with that name! But I have written something called LinearGradientWithMidpointsBrushExtension. And as you might guess from the name, it’s a markup extension.
If you’re not familiar with markup extensions, they are classes that you can use to set properties in XAML. What makes them special is that they don’t end up being the value of the property you apply them to, despite how the XAML syntax looks. Instead, they get to decide what the value of the property will be—WPF will ask the markup extension to set the property at runtime.
You might be more familiar with the syntax for using a markup extension in an attribute, e.g. any binding expression. The Property="{Binding ...}" syntax is an example of a markup extension as an attribute. But you can also use the property element syntax as I have in my example.
The markup extension I’ve written here will provide a brush at runtime as the property value. In fact it’ll return an ImageBrush. This extension creates a bitmap that is just 1 pixel tall. This bitmap contains the colours needed to represent the fill, as described by the GradientStop and GradientMidpoint elements. It wraps this in an ImageBrush and returns that as the property value. So our Rectangle really ends up getting an ImageBrush as its Fill. Here’s what it looks like:

That output is all you’ll see if you download, compile, and run the demo, so I’ve not bothered packaging it up as an xbap... That bitmap shows you all there is to see.
If you do look at the code, bear in mind that I wrote it as a proof of concept. It’s not production ready—it’s not even close. Bear the following limitations in mind: out-of-order gradient stops and midpoints are not handled correctly; I’ve used ordinary properties where dependency properties would probably be better; the previous shortcut means that you can’t animate this fill or data bind it; the code that generates the bitmap has a very inefficient inner loop; the code that determines the bitmap size isn’t as smart as it should be; normal linear gradient fill features such as StartPoint and EndPoint are missing; interpolation is only done in the sRGB colour space, unlike the LinearGradientBrush, which can also interpolate in scRGB; I’ve done very little testing.
In fact there are probably loads more things wrong with it. Those are just the ones that spring to mind. It’s demo code, so treat it with suspicion. But if you’re curious to see how it works, here it is. I just wouldn’t recommend shipping anything based on it.
Meanwhile, Dear Microsoft, For Christmas, I would like gradient fill midpoints built into the platform!